An introduction to Conda and environment management
Copyright © 2023-2024 UL HPC Team hpc-sysadmins@uni.lu
Author: Georgios Kafanas
Users of a programming language like Python, or any other software tool like R, quite often have to install various packages and tools to perform various operations. The various Linux/GNU distributions offer many packages, however, many package versions are either old or missing completely as administrators try to reduce the size of distributions and the associated maintenance.
Software distribution systems that specialize on various categories of application software have been developed. Systems such as Conda distribute generic types of software, where as systems such as PyPI (Python), Packrat (R), and Pkg (Julia) specialize in a single kind of software. All software distribution system however offer a uniform functionality that includes
- the ability to create and reproduce software environments,
- isolation between environments, and between an environment and the system, and
- easy sourcing of packages from a variety of package sources.
The objective of this course is to cover the basics of package management with Conda. In particular, after this course the users will be able to
- create Conda environment and use them to manage the software and package dependencies,
- document, and reproduce any Conda environment in variety of systems,
- install packages from multiple sources, and
- decide when Conda is the most appropriate tool to manage a system environment.
Pre-requisites
This course focuses on generic aspects of package management. It is assumed that you have some basic knowledge of how to use packages in R or Python. The main package management framework used is Conda, although there will be mentions to some native tools. You can use the techniques covered here both in your personal machine and on HPC clusters.
A brief introduction to Conda
You must be familiar with a few concepts to start working with Conda. In brief, these concepts are package managers which are the programs used to create and manage environments, channels which are the repositories that contain the packages from which environments are composed, and distributions which are systems for shipping package managers.
Package managers
Package managers are the programs that install and manage the Conda environments. There are multiple package managers, such as conda, mamba, and micromamba.
Channels
Conda channels are the locations where packages are stored and from where they can be downloaded and installed. There are also multiple Conda channels, with some important channels being:
defaults, the default channel,anaconda, a mirror of the default channel,bioconda, a distribution of bioinformatics software, andconda-forge, a community-led collection of recipes, build infrastructure, and distributions for the conda package manager.
The most useful channel that comes pre-installed in all distributions, is Conda-Forge. Channels are usually hosted in the official Anaconda page, but in some rare occasions custom channels may be used. For instance the default channel is hosted independently from the official Anaconda page. Many channels also maintain web pages with documentation both for their usage and for packages they distribute:
Distributions
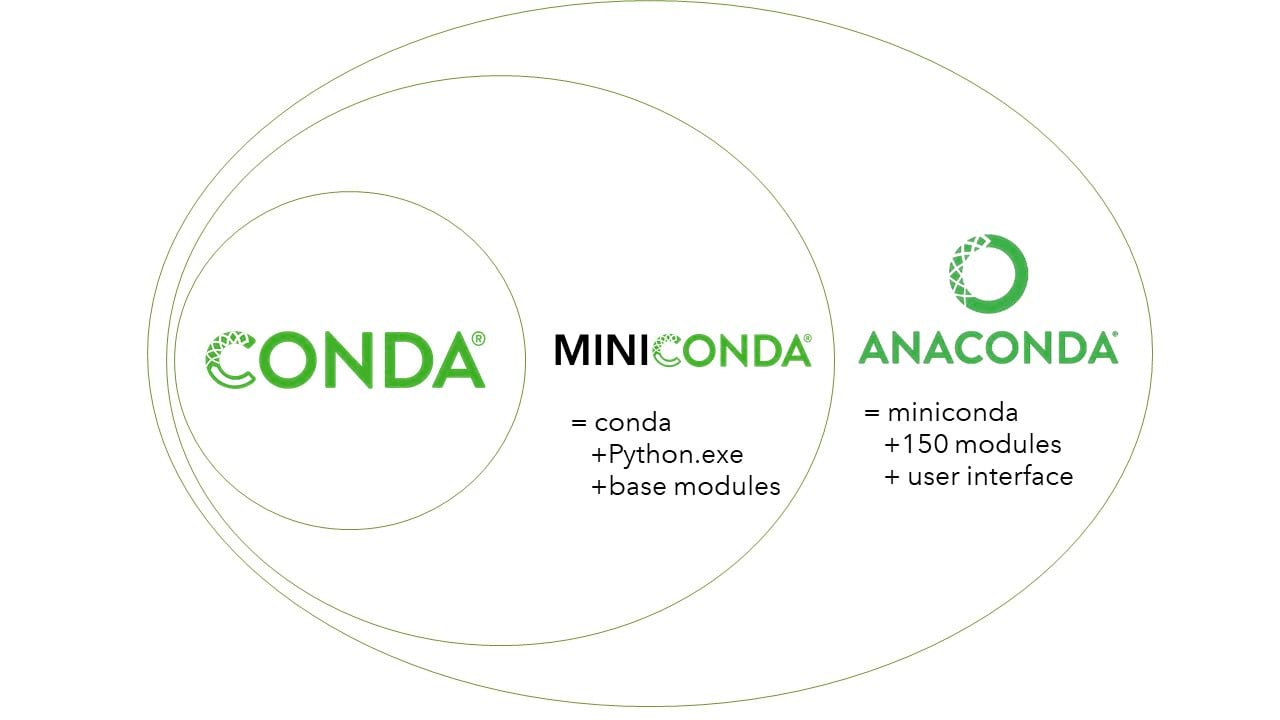
Quite often, the package manager is not distributed on its own, but with a set of packages that are required for the package manager to work, or even with some additional packages that required for most applications. For instance, the conda package manager is distributed with the Miniconda and Anaconda distributions. Miniconda contains the bare minimum packages for the conda package manager to work, and Anaconda contains multiple commonly used packages and a graphical user interface. The relation between these distributions and the package manager is depicted in the following diagram.
The situation is similar for Mamba distributions. Mamba distributions are supported by Conda-Forge, and their default installation options set-up conda-forge as the default and only channel during installation. The defaults or its mirror anaconda must be explicitly added if required. The distribution using the Mamba package manager was originally distributed as Mambaforge and was recently renamed to Miniforge. Miniforge comes with a minimal set of python packages required by the Mamba package manager. The distribution using the Micromamba package manager ships no accompanying packages, as Micromamba is a standalone executable with no dependencies. Micromamba is using libmamba, a C++ library implementing the Conda API.
The Micromamba package manager
![]()
The Micromaba package manager is a minimal yet fairly complete implementation of the Conda interface in C++, which is shipped as a standalone executable. The package manager operates strictly on the user-space and thus it requires no special permissions to install packages. It maintains all its files in a couple of places, so uninstalling the package manager itself is also easy. Finally, the package manager is also lightweight and fast.
Installation
A complete guide regarding Micromamba installation can be found in the official documentation. To install micromamaba in the HPC clusters, log in to Aion or Iris. Working on a login node, run the installation script,
which will install the executable and setup the environment. There are 4 options to select during the installation of Micromamba:- The directory for the installation of the binary file: Leave empty and press enter to select the default displayed within brackets. Your
.bashrcscript should include~/.local/binin the$PATHby default. - The option to add to the environment autocomplete options for
micromamba: Press enter to select the default optionY. This will append a clearly marked section in the.bashrcshell. Do not forget to remove this section when uninstalling Micromamba. - The option to configure the channels by adding conda-forge: Press enter to select the default option
Y. This will setup the~/.condarcfile withconda-forgeas the default channel. Note that Mamba and Micromamba will not use thedefaultschannel if it is not present in~/.condarclikeconda. - The option to select the directory where environment information and packages will be stored: Press enter to select the default option displayed within brackets.
To activate the new environment log-out and log-in again. You now can use micromamba in the login and compute nodes, including the auto-completion feature.
Managing environments
The user interface of Conda is based around the concept of the environment. Environments are effectively system configurations that can be activated and deactivated by the Conda manager, and provide access to a set of packages that are installed in the environment. In the following examples we use the Micromamba package manager, but any other Conda package manager operates with the same commands, as package managers for Conda have the same interface.
Environments are created with the command
The environment is then activated with the command anywhere in the file system. To install packages, first ensure that the target environment is active, and then install any required package with the command: You can specify multiple packages at ones. Quite often, the channels where Conda should look for the package must also be specified. Using the syntax channels are listed in a series of--channel <channel name> entries and the channels are searched in the order they appear. Using the syntax packages are searched in the specified channel only. Available packages can be found by searching the Anaconda search index or channel specific search indices, such as conda-forge. Specifying package channels
The Anaconda index provides instructions for the installation of each package. Quite often the channel is specified in the installation instructions, with options such as conda-forge::<package name> or even -c conda-forge or --channel conda-forge. While the Micromamba installer sets-up conda-forge as the default channel, latter modification in ~/.condarc may change the channel priority. It is thus a good practice to explicitly specify the source channel when installing a package.
After work in an environment is complete, deactivate the environment,
to ensure that it does not interfere with any other operations. In contrast to modules, Conda is designed to operate with a single environment active at a time. Create one environment for each project, and Conda will ensure that any package that is shared between multiple environments is installed once.Micromamba supports almost all the subcommands of Conda. For more details see the official documentation.
Creating an environment for R
Assume for instance that we want to install R. Create an environment call R-project and activate it:
r-base package. Calling or will install all the components required to run standalone R scripts. More involved scripts need functionality defined in various R packages. The R packages are prepended with a prefix 'r-' in the conda-forge channel. Thus, plm becomes r-plm and so on. After all the required packages have been installed, the environment is ready for use. Using environments in submission scripts
In HPC clusters, all computationally heavy operations must be performed in compute nodes. Thus Conda environments are also used in jobs submitted to the queuing system. You can activate and deactivate environments in various sections of your script.
Environment activations in Conda are stacked, and unlike modules, only one environment is active at a time with the rest being pushed down the stack. Assume that we are working with 2 environments, R-project and python-project, and consider the following script layout.
# Initialization code

micromabma activate python-project

# Code to run a simulation and generate output with Python

micromabma activate R-project

# Code to perform statistical analysis and ploting with R

micromamba deactivate

# Code to save data with Python
(base)
|
| # No software is available here
|
+-(python-project) # micromabma activate python-project
| |
| | # Only Python is available here
| |
| +-(R-project) # micromabma activate R-project
| | |
| | | # Only R is available here
| | |
| +-+ # micromamba deactivate
| |
| | # Only Python is available here
| |
We can see that the Python environment (python-project) is pushed down the stack when the R environment (R-project) is activated, and will be brought forth as soon as the R environment is deactivated.
Example SLURM submission script
Consider for instance a script running a single core job for R. The R script for the job is run inside an environment named R-project. A typical submission script is the following:
#SBATCH --job-name R-job
#SBATCH --nodes 1
#SBATCH --ntasks-per-node 1
#SBATCH --cpus-per-task 1
#SBATCH --time=0-02:00:00
#SBATCH --partition batch
#SBATCH --qos normal

micromamba activate R-project

echo "Launched at $(date)"
echo "Job ID: ${SLURM_JOBID}"
echo "Node list: ${SLURM_NODELIST}"
echo "Submit dir.: ${SLURM_SUBMIT_DIR}"
echo "Numb. of cores: ${SLURM_CPUS_PER_TASK}"

export SRUN_CPUS_PER_TASK="${SLURM_CPUS_PER_TASK}"
export OMP_NUM_THREADS=1
srun Rscript --no-save --no-restore script.R

micromamba deactivate
The micromamba deactivate command at the end of the script is optional, but it functions as a reminder that a Conda environment is active if you expand the script at a later date.
Useful scripting resources
Exporting and importing environment specifications
An important feature of Conda is that it allows you to export and version control you environment specifications, and recreate the environment on demand.
- A description of the software installed in the Conda environment can be exported on demand to a text file.
- The specification file can then be used to populate a new environment, in effect recreating the environment.
The environment reproducibility is particularly important when you want to have reproducible results, like for instance in a scientific simulation. You can setup and test your application in your local machine, save the environment, and later load the environment in an HPC system, and be sure that the application will behave identically. Conda in the background will ensure that identical packages will be installed.
In Micromaba, you can export the specifications of an environment using the command:
By default the command prints to the standard output, but you can redirect the output to a file: To recreate an environment from a specification file, pass the file as argument to the create command with the--file flag: This workflow demonstrates the use of simple YAML text files to store specifications, but Micormamba supports various specification file types. All specification files are text files and can be version controlled with a tool such as Git. Sources
Example: Installing Jupyter and managing the dependencies of a notebook with Micromamba
In this example we will create an environment, install Jupyter, and install all the dependencies for our notebooks with Micromamba. Start by creating an environment:
Next, install Jupyter in the environment. Have a look at the page forjupyterlab in the conda-forge channel. To install it in your environment call: Now activate the environment, create a working directory for your notebooks, and launch Jypyter: If a webpage appears with the Jupyter lab, the installation worked succeeded! You may need some Python package in your Jupyter notebook. You can make packages available in your notebook by installing the appropriate package in the Conda environment. For instance, assume that you need pandas and numpy. Searching the conda-forge channel, we can find the package name and installation instruction. With the jupyter environment active, run the command:
numpy and pandas in your notebook! After completing your work, close down the notebook with the command C-c, and deactivate the jupyter Conda environment:
Self management of work environments in HPC systems with Conda
Conda is one of the systems for providing software in HPC systems, along with modules and containers. When starting a new project it is important to select the appropriate system. Before installing any software yourself in user space you should check if the HPC system provides the software though any method. System wide installations do not consume any of your storage quota, and are often configured and tested to provide optimal efficiency.
When a Conda environment is useful
There are three aspects of environment management that you should consider when selecting the method with which you will manage your software.
-
Ease of use: Many software systems whose performance is not critical and are used by relatively few users are not provided though the standard distribution channels of modules or containers. In such cases the easiest installation option is a user side installation with Conda or some similar package management system.
-
Reproducibility: Conda and containers can both create reproducible environments, with descriptions of the environment exported and version controlled in text files. However, containers require significant amount of manual configuration to create a reproducible environment and to perform well in a wide range of systems. If your aim is an easily reproducible environment Conda is the superior choice.
-
Performance: Conda provides precompiled executables. Even thought multiple configurations are supported, you will not always find an executable tailored to your target system. Modules and containers provided by UPC systems are optimized to ensure performance and stability, so prefer them.
Storage limitations in HPC systems
Regardless of installation method, when you install software in user space you are using up your storage quota. Conda environment managers download and store a sizable amount of data and a large number of files to provided packages to the various environments. Even though the package data are shared between the various environments, they still consume space in your or your project's account. There are limits in the storage space and number of files that are available to projects and users in a cluster. Since Conda packages are self managed, you need to clean unused data yourself.
Updating the package manager and the environment
The Micromamba package manager is under active development, so updates provide the latest features and any bug fixes. To update the micromamba package manager itself, simply issue the command:
If a new version is available this commands will download the new executable and replace the old one.Package versions can be pinned with Conda during installation to provide an immutable environment. However, in many cases, like during development, it make sense to experiment and update package versions. To update a specific package inside an environment, use the command:
You can specify more that one packages. To update all the packages in an environment at once, use the command:Cleaning up package data
There are two main sources of unused data, compressed archives of packages that Conda stores in its cache when downloading a new package, and data of packages no longer used in any environment. All unused data in Micromoamba can be removed with the command
where the flag--yes suppresses an interactive dialogue with details about the operations performed. In general you can use the default options with --yes, unless you have manually edited any files in you package data directory (default location ~/micromamba) and you would like to preserve your changes. Updating environments to remove old package versions
As we create new environments, environments often install the latest version of each package. However, if the environments are not updated regularly, we may end up with different versions of the same package across multiple environments. If we have the same version of a package installed in all environments, we can save space by removing unused older versions.
To update a package across all environments, use the command
for e in $(micromamba env list | awk 'FNR>2 {print $1}'); do micromamba update --yes --name $e <package name>; done
for e in $(micromamba env list | awk 'FNR>2 {print $1}'); do micromamba update --yes --name $e --all; done
FNR>2 removes the headers in the output of micromamba env list, and is thus sensitive to changes in the user interface of Micromamba. After updating packages, the clean command can be called to removed the data of unused older package versions.
Sources
A note about internal workings of Conda
In general, Conda packages are stored in a central directory, and hard links are created in the library directories of any environment that requires the package. Since hard links do not consume space and inodes, Conda is very efficient in its usage of storage space.
Consider for instance the MPFR package used in some environment gaussian_regression. Looking into the Conda installation managed by Micromamba, these are the installed library files:
gkaf@ulhpc-laptop:~/micromamba$ ls -lahFi pkgs/mpfr-4.2.1-h9458935_0/lib/
total 1.3M
5286432 drwxr-xr-x 1 gkaf gkaf   94 Oct 25 13:59 ./
5286426 drwxr-xr-x 1 gkaf gkaf   38 Oct 25 13:59 ../
5286436 lrwxrwxrwx 1 gkaf gkaf   16 Oct 22 21:47 libmpfr.so -> libmpfr.so.6.2.1*
5286441 lrwxrwxrwx 1 gkaf gkaf   16 Oct 22 21:47 libmpfr.so.6 -> libmpfr.so.6.2.1*
5286433 -rwxrwxr-x 7 gkaf gkaf 1.3M Oct 22 21:47 libmpfr.so.6.2.1*
5286442 drwxr-xr-x 1 gkaf gkaf   14 Oct 25 13:59 pkgconfig/
gaussian_regression environment, there is a hard link to the MPFR library: gkaf@ulhpc-laptop:~/micromamba$ ls -lahFi envs/gaussian_regression/lib/libmpfr.so.6.2.1
5286433 -rwxrwxr-x 7 gkaf gkaf 1.3M Oct 22 21:47 envs/gaussian_regression/lib/libmpfr.so.6.2.1*
-i flag in ls to print the inode number of a file. Hard links have the same inode number, meaning that they are essentially the same file. Conda will not automatically check if the files in the pkgs directories must be removed. For instance, when you uninstall a package from an environment, when you delete an environment, or when a package is updated in an environment, only the hard link in the environment directory will change. The files in pkgs will remain even if they are no longer used in any environment. The relevant clean routines check which packages are actually used and remove the unused files.